Monday, February 21, 2011
All artwork © Chris Wahl 2019 unless otherwise stated.
All characters are copyright to their respective owners
Syndicated Feeds
- Feedburner
- Atom Site Feed
- Live Journal Site Feed
- March 2006
- April 2006
- May 2006
- June 2006
- July 2006
- August 2006
- September 2006
- October 2006
- November 2006
- December 2006
- January 2007
- February 2007
- March 2007
- April 2007
- May 2007
- June 2007
- July 2007
- August 2007
- November 2007
- December 2007
- January 2008
- February 2008
- March 2008
- April 2008
- May 2008
- July 2008
- September 2008
- October 2008
- November 2008
- December 2008
- January 2009
- February 2009
- March 2009
- April 2009
- June 2009
- August 2009
- September 2009
- October 2009
- November 2009
- January 2010
- February 2010
- March 2010
- April 2010
- May 2010
- June 2010
- August 2010
- October 2010
- November 2010
- December 2010
- February 2011
- March 2011
- April 2011
- May 2011
- June 2011
- August 2011
- September 2011
- October 2011
- November 2011
- January 2012
- February 2012
- March 2012
- May 2012
- October 2012
- November 2012
- January 2013
- February 2013
- March 2013
- June 2013
- November 2013
- January 2014
- March 2014
- July 2014
- August 2014
- September 2014
- March 2015
- August 2015
- September 2015
- January 2016
- March 2016
- July 2016
- August 2016
- February 2017
- April 2017
- August 2017
- December 2017
- May 2018
- Jason Paulos
- Michael Cho
- Melmade
- Wouter Tulp
- Joe Bluhm
- Jason Seiler
- Patrick Mate
- Jonathan Cusick
- Grigor
- UrbanBarbarian
- Euan MacTavish
- Ronald Salas
- Process Recess
- Creature Box
- Tropicaltoxic
- Sparth
- Alberto Ruiz
- Irison
- Oren Haskins
- Chainsaw Art
- Dylan Teague
- Mathieu Reynès
- Ray Lederer
- Damion Dunn
- Samuel Sellers
- Eric Canete
- Cliff Robinson
- Matt Rhodes
- Cory Loftis
- Tom Richmond
- Anders Lazaret
- Thomas Lebeltel
- Rad How to...
- Character design notes
- Concept Art
- Rodguen
- Joshua Middleton
- Craig Phillips
- Adam Hughes
- James Jean
- Jon Foster
- Tomer Hanuka
- Barnaby Ward
- Oren Haskins
- Character Designs
- Will Murai
- Stanley Lau
- Adam Hughes-Deviant Art
- Frank Stockton
- IDrawGirls
- Tiago Hoisel
- Heri
- Marcelo Baez
- Chrissie A
- Jert
- J Nowland
- Hans Ranum
- Seo Kim
- Erica
- Paul Briggs
- Leopolddo
- PJ Holden
- Daniel Cox
- ThickBlackOutline
- Monkeyfeather
- Tooninator
- Eric Talbot
- Paul Lasaine
- Loren Lorente
- Patrick Kendall
- Muffin
- Marcelo Braga
- Joe Suitor
- Artorder
- Niall O'Loughlin
- Eric Scala
- Brocasso
- Kelly Brown
- Anders Lazaret
- Attractive Art Community
- Jeff West


24 Comments:
Absolutely incredible, Chris.
This has to win.
REALY REALY REALY GOOD.. I know Bardot (Cause I m French) And this one is better than your first one.... so good... Well done..
That is stunning Chris - superb !
This is incredible, Chris! I hope you win!
Absolutely beautiful!!!
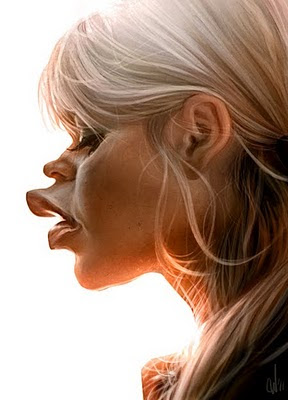
Great likeness and awesome rendering !! I like the way the light hit her skin. Your previous version of Bardot was already great by the way.
FANTASTICA!!
this is 100% a winner! I LOVE the composition and design. Great work, Chris
Thanks guys!! Your comments are always appreciated.
whaaaa. hoow? your.... I love it! super big mega awesome job Chris.
She is fantastic! I love the light, and I'd really like to know your way of coloring from step 2 to step 3. I personnaly like to render in B&W and when come the moment to apply colors, I always get confused...
Wow, amazing work! :)
Damien, David, Toby- Thanks guys!
David- Basically I started to colourise it before adding the hair detail. So, pretty much just after step number two, I had a layer above the black and white set to colour mode, then just airbrushed or hard brushed the basic colours for the flesh tones, lighting and base hair colours.
I then put another layer on top and started to add the hair detail in colour, not black and white. Because the brush I was using had opacity jitter, the gradients of colour from the colour layer below was showing through the painted hair detail and this helped add to the realism of the hair. It would have been a lot harder to achieve this if I had completed the render fully in black and white and then tried to add all this subtle colour detail on the colour mode layer.
Eventually when I was about 80% finished I flattened the whole piece then just refined the rest of the detail in colour.
Hope that helps explain the process for this painting.
Any more questions let me know.
Thank you very much for your explainations Chris, indeed it helps a lot!
Amazing!
Awseome Work Mr. Wahl!
Wow!
holy moley!
ya know, i actually like the first step with the flat color as well.
Me sumo a todo lo que han dicho Chris, espectacular!!
wow. The way you've captured the light hitting her skin and the fine hairs around her ear is just amazing! superb work.
UNBELIEVABLE!!! This is perfection!
SUPERB!
This is STUNNING! Wow!
awesome myfriend
thankyou very much for sharing the process color.peace:)^_^
Post a Comment
<< Home