
Paperboy Step-by-Step
This is a job I did earlier this year for The Sydney Morning Herald. I'll be taking you through step by step from rough to final, explaining one of my very easy 'painting' methods (and I use that term loosely) along the way.

The brief was to have a classic 50's American style paperboy promoting the paper's subscription offer. I provided this rough sketch indicating the pose and the positioning of the text (which I was also doing) for the layout of the leaflet.
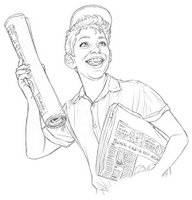
They initially were expecting a more cartoony style as indicated in my rough, but to achieve the 1950's look, I wanted to go for a bit more realism. Using photo reference of paperboys and also myself (don't ask), I created this line drawing.

The next step in my process was to completely shade the drawing in pencil. This is the most important and time-consuming step in my 'painting' process as you'll see later.

I scan this drawing into Photoshop, and with the drawing on a separate layer, I create some flat colours. The grey pencil is also colourised to match the flats.

Next step is to add highlights and a few shadows to the colour layer (most shadows are already indicated with the pencil.)
Once that is done I take the flattened artwork into Painter Classic. Now this is where my painting comes to life. Think of it as using water with Watercolour pencils to create a painting.
 Using the 'Just Add Water' tool, I blend the pencil work into the colour work to create a smooth painterly look.
Since all the hues and tones are already worked out, you can work pretty fast, which achieves quite a good spontaneous look. Also the opacity is set fairly low, so a little bit of the pencilwork shows through to retain that organic, hand-drawn feel.

Once that stage is over, it's back into Photoshop, where I add the newspaper titles, do any colour corrections and finally add some noise to the pic to dirty it up and reduce the digital feel.

Finally the background (which was created using a similar method as above), the starburst effect (which involved creating a radial blur mask) and the text (hand-drawn, scanned and coloured in Photoshop) were added for the finished pic!
Hopefully this is a helpful insight into one of the ways I create my work. It's a very simple method, and is good for people lacking in traditional painting skills...like me.

The brief was to have a classic 50's American style paperboy promoting the paper's subscription offer. I provided this rough sketch indicating the pose and the positioning of the text (which I was also doing) for the layout of the leaflet.

They initially were expecting a more cartoony style as indicated in my rough, but to achieve the 1950's look, I wanted to go for a bit more realism. Using photo reference of paperboys and also myself (don't ask), I created this line drawing.

The next step in my process was to completely shade the drawing in pencil. This is the most important and time-consuming step in my 'painting' process as you'll see later.

I scan this drawing into Photoshop, and with the drawing on a separate layer, I create some flat colours. The grey pencil is also colourised to match the flats.

Next step is to add highlights and a few shadows to the colour layer (most shadows are already indicated with the pencil.)
Once that is done I take the flattened artwork into Painter Classic. Now this is where my painting comes to life. Think of it as using water with Watercolour pencils to create a painting.
 Using the 'Just Add Water' tool, I blend the pencil work into the colour work to create a smooth painterly look.
 Since all the hues and tones are already worked out, you can work pretty fast, which achieves quite a good spontaneous look. Also the opacity is set fairly low, so a little bit of the pencilwork shows through to retain that organic, hand-drawn feel.

Once that stage is over, it's back into Photoshop, where I add the newspaper titles, do any colour corrections and finally add some noise to the pic to dirty it up and reduce the digital feel.

Finally the background (which was created using a similar method as above), the starburst effect (which involved creating a radial blur mask) and the text (hand-drawn, scanned and coloured in Photoshop) were added for the finished pic!
Hopefully this is a helpful insight into one of the ways I create my work. It's a very simple method, and is good for people lacking in traditional painting skills...like me.
posted by Chris Wahl at 9:28 PM
![]()
![]()

50 Comments:
I recently discovered your blog and have been enjoying it immensely. I'm always fascinated by the processes of different artists. How did you go from pencil shading to adding the flat colors in Photoshop? Did you use the magic wand tool to select any of the areas?
Incredible work!!
I have always been interested in the process of how artists such as yourself have incorporated computers into the designing process of their work.
Keep up the good work.
Hayden- How long did it take for each step? Way too long. I tend to get bogged down on trivial details sometimes.
Simone- Thanks.
Guy- Thanks.
The pencils were put on a separate layer, blending mode on multiply. With this particular drawing, I cleaned up the edges in Photoshop, and used the Magic Wand tool to select the outside white area around the drawing. Invert the selection so you've now got the whole drawing selected, contract the selection by one or two pixels, then on the layer below, fill it with a flat colour. From there you can separate that one area of colour into the various colours for the whole picture.
Hope that made sense. If you need anyhting else clarified, let me know.
very interesting method of using the "just add water" tool, I like the results of it, from the sketchy feel to the painterly fresh look. I gotta try that my self now. I aways been curious on your drawing and painting method, you mention that it's just one of the techniques you use to paint, Hope you post more "how to" in the future.
-heri
This is very helpful. Really demystifies the process. Can I ask what kind of scanner you use? And what dpi you use for a good print size?
Thanks, Heri.
Pauk- I use a Mictrotek Scanmaker, technically it's a great scanner, but it's software has always conflicted with my operating system. resulting in many crashes.
I scan the pencil drawing in and do the final art at 600dpi. Once finished I resize to 300dpi.
how did you colourize the line work?
Wow--this is an outstanding piece! Absolutely beautiful! And thank you for taking the time to post the steps--it's wonderful to get a look at your process. GREAT job, as always!
Tang- Firstly let me explain how I prepare my pencils in Photoshop. I use a free plugin by Flaming Pear called 'Ghost'. What this does is takes a shaded grey and white drawing and puts it on a layer, replacing all the white with transparency. (e.g. 100% white is 100% transparent, 50%grey is 50% black 50% transparent). This allows me to have colour on the layer below without having to make the pencils a mulitply layer.
So saying that, to colourize your linework just check the 'preserve transparency' box and colour straight over your linework with the brush or pencil tool.
Or a quicker way is to set the pencil layer to 'overlay' and the linework will be colourized the same as the flat colours on the layer below.
Hope that makes sense.
Chrissie- Thanks! Glad you like it.
How good is this . You are the best.
Thanks, Rocky!
*Hopefully this is a helpful insight into one of the ways I create my work* -- Yes it IS! Thanks for sharing and taking time to explain the steps, as well as answering the comments here. You're talented as well as helpful. (RamblingLibrarian bows and chants, "I'm not worthy"). You've just got yourself a new fan.
Thanks for the kind words, ramblinglibrarian. Glad I could be of help.
It's comments like yours and everyone else's, that spur me on to make this blog into something special.
So, once again...thankyou.
Thanks Chris. I love learning this technical stuff. More, more.
I was wondering about the hand drawn text. Did you turn it into vectors? Well it seems very smooth anyway.
Thanks Mic.
The red text's outline was hand inked on paper and then scanned into Photoshop at 600dpi. The eraser was used to clean up any rough edges. It was then turned red and filled with the solid red colour. Stroke was then used to add a white outline around the edge. No vectorizing. Noise was then added at the end so it didn't look too computery.
The black text was a handwritten font I created which had been vectorized.
Hi Chris,
Great work dude. If you have the time for more, these step-by-step tuts are really informative. The time-lapse vids are good, but it's interesting to see the actual techniques you use.
cheers,
Anton
www.antongraphics.com
Hey Anton
Thanks for the feedback. My aim is to eventually somehow combine the two.
Great work on your site, by the way.
this is great. Thanks for sharing your process!
Thankyou and you're welcome, floating soul.
GREAT STUFF CRHIS!!!
Really Impressive!
I just want to make some questions...
Where can I find the "just Add Water" tool in photoshop CS2?
Or... at least... where is this tool in a previous Photoshop?
Thanks for sharing your tricks!
OMAR.
Hi Omar
The 'Just Add Water' tool is in Painter Classic, not Photoshop unfortunately, but you can get a similar effect with the 'Smudge' tool in Photoshop.
Also I should point out that some people are having trouble finding the 'Just add water' tool in their versions of Painter Classic. Confusingly, there are a few different versions floating around, some have the tool, some don't. The version I use is made by Meta-Creations, which came bundled with my Wacom many years ago.
howdy chris,
your artworks and of course your tutorials are great!
i was looking so long for a good solution to color
my outlines, like you did it with the your paperboy
… now, with "ghost" it works very well.
thanks a lot for all the tricks and the time your spending us here, mate!
greetings from germany! joe
You're welcome, Joe! Glad I could help out.
excellent work ,and thanks for publishing your technique, I have tried photoshop and failed miserably.
can't wait to give this a try.
Rod
deantoons.blogspot
Thanks Rod!
Looking forward to seeing your experiments.
wow! I AM AMAZED! =) ill view your site more often
Hey Chris -
You are a master of drawing, rendering and colouring. I am very inspired by your work.
I was curious as to how large that original pencil render is? The one that you used to scan in and colour onto?
- Sue -
Thanks numbako!
Sue- Thankyou. The original pencil render was A4 size (8x11 inches)
Hi Chris-
Great work, thanks for the tutorial. I had a question: After you made the flat colors on a seperate layer from the scanned pencils, you say "the grey pencil is colorized to match the flats". How did you do that? The problem I have is when I put flat colors on a multiply layer about the grayscale pencils, I get a weird look, like a colorized black and white movie, and I think I need to color the pencils like you do so they blend with the flat colors on the other layer. If you could explain how you color the pencils I would really appreciate it!
HI Anonymous
Here's the way I do it (there are probably other simpler ways, but here's mine)...
Firstly you need a free plugin for Photoshop called 'Ghost'. It can be found over at the flaming pear website in their 'free plugins' pack. What this plugin does is convert the white areas in your pencil layer to transparent. This will allow you to use some layer effects in Pshop without effecting the flat colours.
With 'ghost' installed, I duplicate the pencil layer, so I now have two identical pencil layers. Covert the bottom pencil's layer effects to Overlay. Now reduce the opacity of the overlay layer and the normal layer to about 50% each (adjust these percentage to suit yourself) and there you have it. The line will be colourised to match the flat colours below.
That's fantastic. Really excellent retro style.
Thanks man!
Chris, this is awesome. Can I ask, is the "Painter Classic" a Corel product and if so, how do I find the "just add water" feature?
You are fantastic. thank you so much
Nick- Painter Classic was by MetaCreations before Corel bought them out.
In current versions of Painter, 'just add water'
can be found in the Blender tools.
Thanks
Just fantasic how you have discribed the way you do your artwork
Keep it coming
Thanks Eggy!
So awesome Chris. Thanks for taking the time to do this, it is very insightful, especially for someone like myself who is very "green" at digital illustration.
Thanks
Tom
www.urbancowfolks.com
You're welcome Tom!
wonderful tehnique, but do you have anyplans on showing us how to do this through a video or an actual screen capture?LOL it just seems like A LOT of steps. just curious
Thanks
Since the steps involve scanned pencils, Painter and Photoshop it might be a bit difficult to capture but I'll keep your request in mind next time I'm looking to make a video.
Thank you so much! A vidoe would be great. I'm a very visual learner LOL, cant wait
A VIDEO WOULD BE HELPFUL. CAN WE FIND YOU IN YOU TUBE?
Thank you for this tutorial. I love coming to your blog to learn and soak up some crazy knowledge. Don't ever stop makin' art! You are awesome.
Cheers!
Amy
That Tutorial is Just awesome!! Thanks alot, I'l be following coz i really like your techniques and i really want to Learn Digital painting and Teach it One day!:)
Glad to be of help, guys.
This is great. I've only just recently started to dabble in digital colouring, so as you can imagine it's been an almost daunting process of trial and error, learning how to do it. Post like this are extremely helpful. Thanks!!
This is great. I've only just recently started to dabble in digital colouring, so as you can imagine it's been an almost daunting process of trial and error, learning how to do it. Post like this are extremely helpful. Thanks!!
Here it looks realy easy to do but in real ... I can't get the same ... but I still working on ... ;) !
thx for that "step by step"
I was traditionally trained and handle those mediums as well as can be expected, but since jumping into the digital world I've had to learn an entirely new medium. Thank you for sharing this info with the world. It is much needed.
Exelent job, Chris!
Do you always use this method or was it just for the 'retro' look of this piece?
Post a Comment
<< Home